Dual booting pfSense and Linux
I bought a low-cost computer on AliExpress recently to experiment with some network security and administration tools and techniques. I wanted to give a try to the pfSense firewall distribution but at the same time I’m familiar with the Linux networking stack and I honestly don’t know where to start to perform ARP spoofing on a BSD-like platform. I wanted my usual Arch Linux box to try out nftables, bettercap and tc on the field :)
Dual booting is the best option IMHO. AliExpress standard shipping isn’t.. well.. fast so I started experimenting in VirtualBox. Google wasn’t very helpful in telling me how to dual boot pfSense and Linux. It’s not officially supported by Netgate and I had some trouble setting up the bootloader. Anyone with some experience and knowledge on UEFI systems could have solved the problem in 5 minutes but it took me an entire day. Thought sharing my solution could help someone.
Formatting and installing pfSense
I wanted a UEFI-only setup and apparently that’s not the most common setup for pfSense boxes. But installing a bootloader and dual-booting on UEFI is way easier than on BIOS/MBR so I wanted to go that way. I started by formatting the disk on Linux; you have to create a FAT32 EFI System Partition (ESP) to store the bootloader. You can also create now the partitions you need to install Linux or whatever you want; leave at least 2 GB of free space for pfSense. If you install your distro now, don’t install the bootloader because it will probably be overwritten by the pfSense installer. To my knowledge the pfSense bootloader takes less than 2 MB on the filesystem so you can keep the standard ESP size recommended by your Linux distro; 200 MB is usually a safe choice.
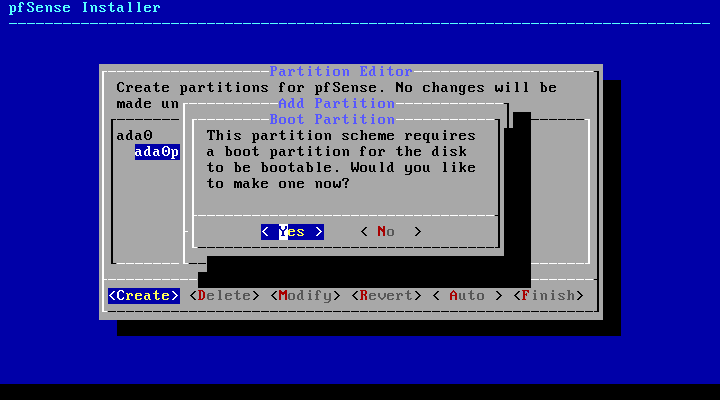
Then boot the machine from the pfSense ISO (you will have to disable UEFI to do
so). Create a partition and set / as its mountpoint; you can choose between
UFS and ZFS as the filesystem. UFS is the default choice, while ZFS has more
advanced features and some people say that it is more reliable in case of power
failure1. When you create the partition the installer will ask you whether
you want to create a boot partition; it’s basically asking you to create a 512
KB boot sector for MBR (I think). We don’t need that as it’s completely ignored
on UEFI systems. Answer “No” and finish the installation – the installer
apparently doesn’t install the bootloader on EFI automatically, we’ll do that in
a moment.
Installing the pfSense bootloader
When the installation is completed it will ask you whether you want to open a
shell to perform final modifications; choose “Yes”. Now mount your ESP on some
temporary mountpoint, e.g. /mnt. Assuming /dev/ada0p1 is your ESP (it was
shown in the partition editor):
$ mount -v -t msdosfs /dev/ada0p1 /mntNow you have to manually copy the EFI binary on the ESP. It took me some time to
figure out where the binary was stored on the root filesystem. I ended up
looking at the bsdinstall sources. I’m installing it the
/efi/pfsense subdirectory (I like keeping PE/EFI binaries in a different
directory than bootloader configuration files and Linux vmlinuz/initrds).
$ mkdir -p /mnt/efi/pfsense
$ cp /boot/loader.efi /mnt/efi/pfsense
Installing the Linux bootloader
Now we’ll have to set up an EFI bootloader that will allow us to choose between
Linux and pfSense at boot time. I’m using systemd-boot
(formerly gummiboot), a lightweight and clean EFI-only bootloader. The same can
be achieved with GRUB2 by chainloading an EFI binary; an example can be found
on the Gentoo wiki, just replace the path to the
Microsoft Boot Manager with /efi/pfsense/loader.efi.
Boot again on Linux, preferably with UEFI, so that efibootmgr will be able to
save the newly installed bootloader. systemd-boot usually comes packaged with
systemd – at least on Arch. In case you haven’t installed your distro, you can
do that now. Then mount your ESP (/dev/sda1 here) and install the bootloader
with bootctl. On some distros /boot may not be an empty directory on your
root filesystem; /efi is a popular choice as an ESP mountpoint in that case.
$ mount /dev/sda1 /boot
$ bootctl --esp-path=/boot install
Now setup bootloader entries in /boot/loader/entries/ for Linux and then setup
the entry to chainload the pfSense bootloader:
# /boot/loader/entries/pfsense.conf
title pfSense
efi   /efi/pfsense/loader.efi
Edit your loader.conf accordingly (if you don’t set a timeout it won’t show
you the boot menu):
# /boot/loader/loader.conf
timeout 3
console-mode keep
default pfsense.conf # or arch.conf/whatever entry you added for your distro
Reboot and you’re done! With systemd-boot you can also choose which bootloader
entry you want to fire up on the next boot with systemctl reboot --boot-loader-entry=pfsense.conf. This could be useful for a headless-only
setup, as my portable 150$ AliExpress mini PC will probably be.
Considering that this mini PC won’t have a fan, ZFS could be a wise choice in case the temperature rises above critical levels and the CPU does an emergency stop :)↩︎